
>>

Chewy, chocolatey cookies crowned with melty Andes mints for a perfect mint-chocolate bite. Easy, fast, and ideal for make-ahead treats.

This recipe for Andes Mint Cookies quickly became my new favorite the first winter I tried it. I was searching for a fuss-free cookie that delivered both chocolate depth and a bright mint finish, something that would appeal to guests after a heavy meal yet still be easy enough to make for an impromptu coffee break. Using a boxed Devil's Food cake mix as the base keeps the dough soft and reliably chocolatey while Andes mints added after baking melt into a glossy, cool-tasting topping. The contrast between the slightly crisp edge and chewy center is what keeps people coming back for more.
I discovered this combination at a holiday cookie swap when someone brought a batch and I immediately asked for the method. I adapted it to be a little softer in the center by watching the bake time closely and smoothing the mint with a spoon while the cookie was still hot. What makes these special is the simple flip of technique that transforms a store-bought mix into a small-batch bakery-style bite. They travel well, freeze beautifully, and taste surprisingly sophisticated for how little hands-on time they require.
I learned early on that the smoothing step — using a spoon to spread the melted mint — is the secret. Friends at potlucks always assume I made them from scratch, and my family prefers them straight from the fridge. They are as much a nostalgic holiday cookie as they are a weekday indulgence.
The ingredient list is intentionally short because the boxed mix does heavy lifting. When shopping, check the cake mix label for freshness dates and store Andes mints in a cool cabinet to prevent clumping.

My favorite aspect is the simplicity. Once I started making these for holiday trays, family members began requesting them cold straight from the fridge. They keep their shine and mint flavor even after freezing, and the method consistently produces a bakery-style finish without complex steps.
Store cooled cookies in an airtight container at room temperature for up to five days. Layer with parchment paper to prevent sticking and preserve the glossy mint finish. For longer storage, arrange cookies in a single layer on a sheet pan and freeze until solid, then transfer to a resealable freezer bag for up to three months. To reheat, let frozen cookies thaw on the counter for 15 to 20 minutes or warm briefly in a 200 F oven for 3 to 5 minutes if you prefer the mint to be soft again. Avoid refrigerating in a damp environment which can make edges sticky.
If you prefer a slightly different chocolate profile, substitute the Devil's Food mix with a chocolate cake mix labeled dark chocolate for richer cocoa notes. Replace vegetable oil with melted coconut oil for a faintly tropical aroma, but expect the mint to taste subtly different. For an egg-free variation, use a commercial egg replacer or two tablespoons of aquafaba per egg; texture will be slightly less structured. For a lower-sugar cookie, choose reduced-sugar cake mix and opt for sugar-free Andes-style mints, though melting behavior may vary.
Serve cooled cookies with a cup of strong coffee or a minty hot chocolate for a theme match. For a party platter, arrange on a cake stand with fresh mint leaves as garnish and intersperse with plain chocolate chip cookies for contrast. These are excellent after-dinner bites when paired with a simple scoop of vanilla ice cream — place a warm cookie under the scoop to create a soft sandwich. For gift boxes, stack them with parchment separators and finish with a ribbon.
The mint-and-chocolate pairing is a classic that traces back to European confection traditions, where mint and dark chocolate were often combined for palate-cleansing aftertaste. Andes mints themselves emerged as a popular American confection and are emblematic of mid-20th-century candy innovation. These cookies are not tied to a specific holiday but have become a contemporary seasonal favorite because mint is associated with winter festivities and the robust chocolate base echoes traditional American baking comforts.
In winter, use peppermint extract in the dough for an extra festive note; reduce additional extract to 1/4 teaspoon so the candy topping remains dominant. In summer, chill cookies and serve with fruit-forward compotes to balance the mint. For spring or St. Patrick's Day, use green-colored sanding sugar lightly sprinkled before the mint sets for a playful look. Swap Andes mints for mint-flavored dark chocolate disks in autumn if you want deeper cocoa nuance.
To prep ahead, bake the cookies through the cooling stage, then place un-topped cookies in the freezer. Store the Andes mints wrapped separately at room temperature and top the thawed cookies and smooth the mints on the day you plan to serve for the freshest finish. Pack cookies in individual portions using parchment squares to keep them neat for lunches or event favors. Label freezer containers with dates and use within three months for best flavor.
At a recent family reunion, I brought three batches and they vanished within an hour. A friend who usually dislikes boxed-mix desserts insisted these were from a bakery and asked for the recipe. My neighbor uses the same method to make mini tartlets by pressing dough into muffin tins and topping with Andes mints — a brilliant twist that produced a handheld pastry favored by kids at a school fundraiser.
These cookies have become a tiny ritual in my kitchen: quick to assemble, reliably impressive, and full of comforting chocolate-mint flavor. I encourage you to try smoothing the mints by hand the first few times to get a feel for the melting window. Once you master that, these will become an effortless crowd-pleaser in your repertoire.
Watch the cookies closely between 6 and 9 minutes; remove when edges are set but centers still soft to keep chewiness.
Place Andes mints on the cookies immediately after removing from the oven and wait about 5 minutes before smoothing for best spread.
Freeze baked, un-topped cookies on a sheet pan until solid before transferring to a bag to maintain shape and prevent sticking.
This nourishing andes mint cookies recipe is sure to be a staple in your kitchen. Enjoy every moist, high protein slice — it is perfect for breakfast or as a wholesome snack any time.
This Andes Mint Cookies recipe makes perfectly juicy, tender, and flavorful steak every time! Serve with potatoes and a side salad for an unforgettable dinner in under 30 minutes.
Preheat oven to 350°F and position a rack in the center for even baking.
In a large bowl combine the 15.25-ounce cake mix, 1/2 cup vegetable oil, and 2 large eggs. Stir until a cohesive slightly sticky dough forms. Add a teaspoon of water if mixture is too dry.
Roll dough into 1-inch balls (about 1 tablespoon each) and place 2 inches apart on a quarter sheet pan lined with parchment.
Bake at 350°F for 6 to 9 minutes until edges are set and centers remain slightly soft for chewiness.
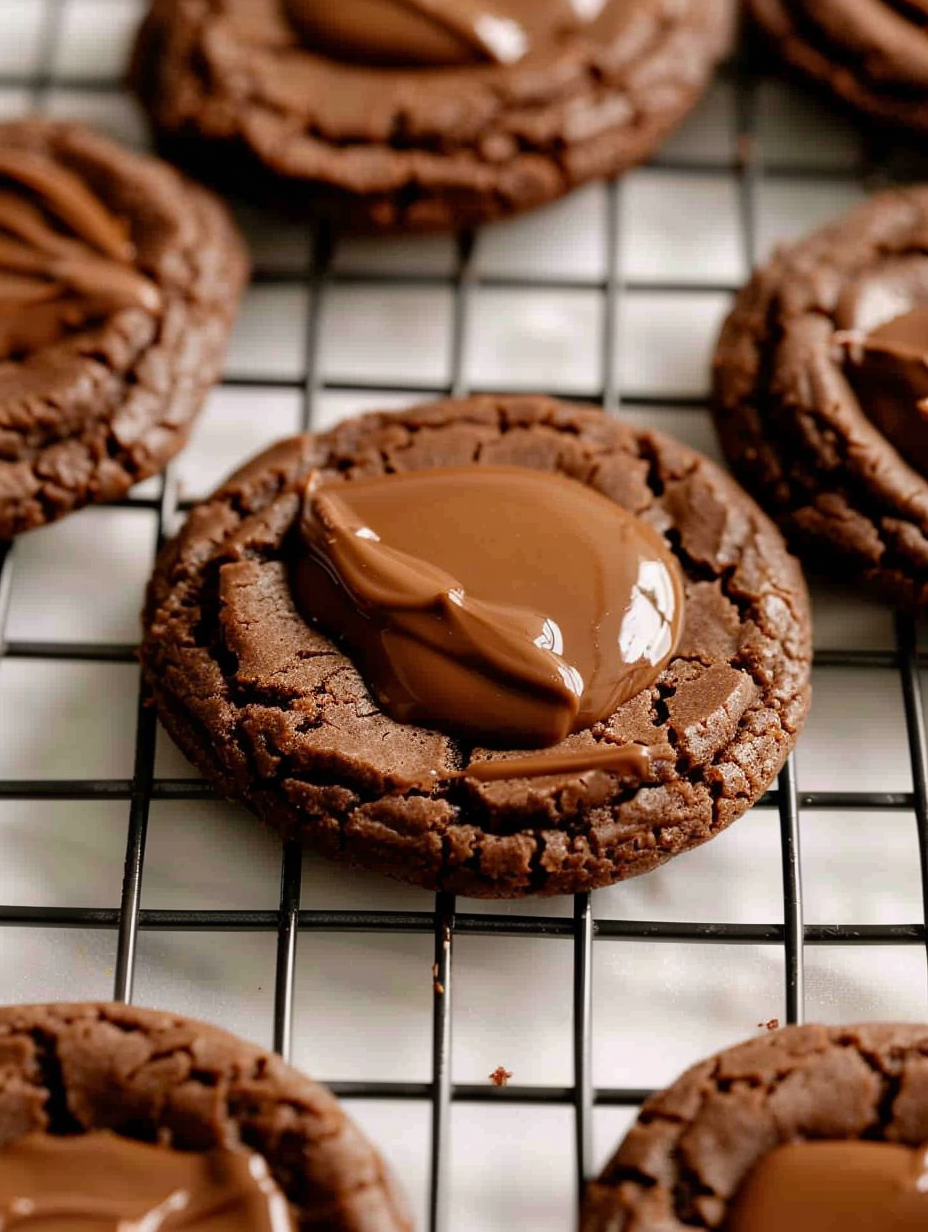
Remove pan from oven and immediately press one Andes mint into the top of each hot cookie. Let sit on the counter for about 5 minutes until the mint softens.
Use the back of a spoon to smooth the melted mint into a glossy topping. Cool on the pan 10 minutes before transferring to a wire rack.
Last Step: Please leave a rating and comment letting us know how you liked this recipe! This helps our business to thrive and continue providing free, high-quality recipes for you.
Leave a comment & rating below or tag
@yummique on social media!

Tender grilled zucchini wraps basil ricotta, bathed in marinara and mozzarella, baking into a bubbly, lighter Italian comfort dinner ready in 30 minutes.

Crisp-edged, tender-in-the-middle zucchini and yellow squash made in 15 minutes with pantry spices. A vibrant, veggie-forward side everyone devours.

Tender chicken meatballs simmered in rich marinara and blanketed with melty mozzarella, bringing all the flavors of chicken parm in cozy, bite-sized form.
Leave a comment & rating below or tag @yummique on social media!
Enjoyed this recipe? Share it with friends and family, and don't forget to leave a review!
This recipe looks amazing! Can't wait to try it.
Comments are stored locally in your browser. Server comments are displayed alongside your local comments.

Join to receive our email series which contains a round-up of some of our quick and easy family favorite recipes.
