
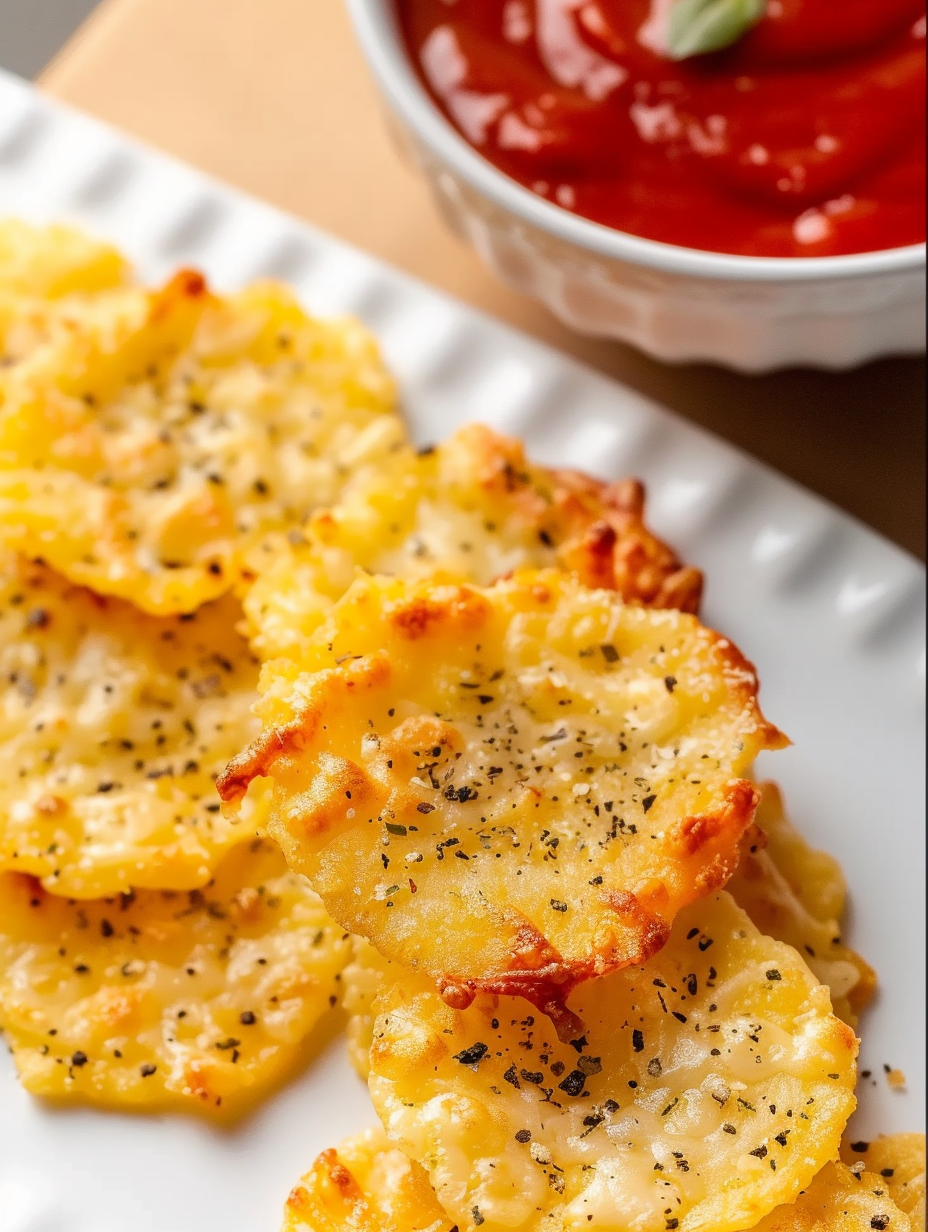
Baked Cheese Crisps (Plain + Flavors)

A quick, 12-minute method for golden, crunchy cheese crisps with a basic technique and seven easy seasoning variations — perfect for snacks, salads, and party platters.

Why You'll Love This Recipe
- Fast: ready in about 12 minutes total (5 minutes prep, 7 minutes bake) — ideal when you need a last-minute snack or crunchy garnish.
- Flexible: uses common cheeses (Parmesan and Cheddar), but you can use any firm, aged cheese for different flavors.
- Make-ahead friendly: cool and store in an airtight container for up to a week, or freeze for longer storage and re-crisp in the oven.
- Low-carb and gluten-free naturally, making these great for special diets without substitutions.
- Customizable: try 7 simple seasoning combos included below to suit salty, spicy, herby, or savory cravings.
- Minimal equipment and pantry-friendly ingredients — just a baking sheet, parchment, a grater, and a bowl.
In my kitchen these crisps have become a ritual: I often double the batch before guests arrive and hide a few to save for salads the next day. Friends always ask for the "secret" — there isn't one beyond using freshly shredded cheese and spacing the little mounds evenly so they spread into perfect rounds.
Ingredients
- Parmesan cheese (3/4 cup, shredded): Choose a dry, aged Parmesan or Grana Padano rather than a crumbly, pre-grated product with anti-caking agents. Freshly shredded from a wedge gives the best melt and texture.
- Sharp Cheddar cheese (3/4 cup, shredded): A sharp, well-aged Cheddar adds depth and a melty body. Medium works in a pinch but the flavor will be milder.
- Italian seasoning (1 teaspoon, optional): A simple herby finish; substitute for other seasonings (see variations) depending on desired flavor profile.
- Salt & cracked black pepper (optional): Use sparingly — Parmesan and Cheddar are already salty. A light dusting of coarse black pepper adds a pleasant bite.
Notes on shopping: buy block cheeses and grate them yourself for the best results; pre-shredded cheese often contains starch or cellulose to prevent clumping, which inhibits melting and lacing. For best texture, refrigerate the cheese and shred it cold so the pieces remain separate when you portion them.
Instructions
Preheat and prep: Preheat the oven to 400°F (204°C). Line a large baking sheet with parchment paper to prevent sticking and promote even browning. Position a rack in the center of the oven for the most uniform heat. Gather your cheeses and measuring tools so you can work quickly once the oven is hot. Combine cheeses: In a medium bowl, stir together the shredded Parmesan and Cheddar until evenly mixed. Mixing creates a balance of fat and protein that helps the crisps spread thin and brown without becoming greasy. If using a seasoning, stir it in now so each mound is seasoned evenly. Portion the mounds: Place uniform tablespoon-sized heaps of the cheese mixture onto the prepared baking sheet, leaving about 2 inches (5 cm) between each mound to allow the rounds to spread. Use a measuring spoon for consistency and press any large shreds slightly so they form tidy circles. Bake and watch: Bake for 6–8 minutes until the edges begin to turn golden brown. Keep a close eye: they can go from perfectly browned to burnt in under a minute. Rotate the sheet halfway if your oven has hot spots. The centers will still be slightly glossy — that’s okay; they crisp as they cool. Cool and crisp: Allow the crisps to cool on the pan for 1–2 minutes to set, then transfer them to paper towels to remove any residual oil and finish crisping. They will become fully crisp at room temperature within a few minutes. If you need them extra crunchy, cool on a wire rack so air circulates underneath.
You Must Know
- Freshly shredded cheese melts more evenly; avoid pre-shredded blends with anti-caking agents for best lacy edges.
- Store cooled crisps in an airtight container at room temperature for 1–2 days for best crunch; refrigerating will soften them unless re-crisped.
- These are naturally gluten-free and low in carbohydrates, making them an excellent garnish or snack for many diets.
- Freeze leftover crisps flat in a rigid airtight container for up to 6 months and reheat briefly in a 350°F oven to re-crisp.
My favorite part of these crisps is how many ways they can be served: as a crunchy spoon for creamy dips, a salad topper, or stacked into little towers for party platters. Family and friends often comment on how elegant they look despite requiring almost no effort.
Storage Tips
Keep cooled crisps in an airtight container at room temperature for up to a week, though they’re best within 48 hours. If refrigeration is necessary, separate layers with parchment or paper towel to absorb moisture and re-crisp in a 325°F oven for 3–5 minutes. For long-term storage, freeze flat in a single layer inside a rigid container for up to six months; thaw at room temperature and reheat briefly to bring back the snap. Quality indicators: glossy, slightly oily surface indicates they need more cooling; fully matte and brittle means ready to eat.
Ingredient Substitutions
If you don’t have Parmesan, use Pecorino Romano for a saltier, sharper finish. Monterey Jack creates a milder, more flexible crisp while Asiago gives a nutty, complex flavor similar to Parmesan. For dairy-free alternatives try a plant-based shredded "parmesan-style" and a high-fat vegan cheddar — results will vary and often need a lower bake temperature to avoid scorching. Reduce salt or omit added salt when using very salty cheeses like aged Pecorino.
Serving Suggestions
Serve as an appetizer with hummus, guacamole, or a yogurt dip, or use as a garnish for soups (especially creamy tomato or cauliflower) and salads (Caesar is a natural pairing). For entertaining, stack different flavored crisps on a cutting board alongside olives, cured meats, and small ramekins of jam or mustard. Garnish with microgreens or a drizzle of olive oil for added sheen and a fresh contrast.
Cultural Background
Crisped cheese snacks have roots in various cuisines where cheeses are baked or fried into thin wafers; in Italian cooking, toasted Parmesan shards (sometimes called "frico") are similar and were originally a way to concentrate flavor and texture. The modern baked crisp technique borrows from that tradition but streamlines it for quick home preparation. Across cultures, transforming cheese by heat into a crunchy element is a common approach to add texture and umami to dishes.
Seasonal Adaptations
Spring: fold in chopped fresh herbs like chives and parsley for a lively flavor. Summer: add zesty lime zest and a pinch of smoked paprika for a bright, smoky snack. Autumn: scatter toasted pumpkin seeds and a dash of cinnamon with aged cheddar for a cozy riff. Winter: mix in rosemary and a touch of crushed red pepper to pair with hearty stews and braises.
Success Stories
Readers tell me they gift these crisps in small jars at holiday parties and that they’ve become a hit with kids who don’t usually like cheese — the crisp texture sells it. One friend layered them between salad plates at a dinner party and guests laughed at the elegance despite the simplicity. Another reader reported their crisps re-crisp perfectly after freezing for a picnic, which was a life-saver when preparing ahead.
Meal Prep Tips
Make multiple batches and store them separated by parchment layers for quick salad toppers or lunchbox snacks. Pack crisps in a small rigid container to prevent breakage. If you want to assemble components ahead, store cheeses separately in a zip-top bag and grate fresh right before baking for the best texture. Re-crisp in a toaster oven or conventional oven for 3–4 minutes just before serving.
These simple crisps are one of those tiny pleasures that elevate everyday meals and entertain with minimal fuss — try a few seasoning variations and make the technique your own. Enjoy the crunch!
Pro Tips
Always shred cheese from a block for best melting and lacy edges; pre-shredded cheese often contains anti-caking agents.
Portion with a tablespoon and leave 2 inches between mounds so crisps spread evenly into rounds.
Watch closely in the last 2 minutes of baking; edges go from golden to burnt very quickly.
This nourishing baked cheese crisps (plain + flavors) recipe is sure to be a staple in your kitchen. Enjoy every moist, high protein slice — it is perfect for breakfast or as a wholesome snack any time.
FAQs about Recipes
Can I store these in the fridge?
Yes. Refrigeration softens them; reheat in a 325°F oven for 3–5 minutes to re-crisp.
Can I freeze cheese crisps?
Yes, freeze in a single layer in an airtight container for up to 6 months and reheat briefly to crisp.
Tags
Baked Cheese Crisps (Plain + Flavors)
This Baked Cheese Crisps (Plain + Flavors) recipe makes perfectly juicy, tender, and flavorful steak every time! Serve with potatoes and a side salad for an unforgettable dinner in under 30 minutes.
Ingredients
Main
Instructions
Preheat and prepare baking sheet
Preheat oven to 400°F (204°C). Line a large baking sheet with parchment paper and position the rack in the center of the oven.
Mix cheeses
In a medium bowl, stir together the shredded Parmesan and Cheddar until evenly combined. Add Italian seasoning if using.
Portion the mounds
Use a tablespoon to place uniform mounds of cheese onto the parchment-lined sheet, leaving about 2 inches between each for spreading.
Bake until golden
Bake for 6–8 minutes until edges begin to brown. Watch closely to prevent burning; rotate sheet halfway if needed.
Cool and transfer
Allow crisps to cool on the pan for 1–2 minutes, then transfer to paper towels or a wire rack to finish crisping and drain any residual oil.
Last Step: Please leave a rating and comment letting us know how you liked this recipe! This helps our business to thrive and continue providing free, high-quality recipes for you.
Nutrition
Did You Make This?
Leave a comment & rating below or tag
@yummique on social media!
Categories:
You might also like...

Cheesy Zucchini Rollatini Bake
Tender grilled zucchini wraps basil ricotta, bathed in marinara and mozzarella, baking into a bubbly, lighter Italian comfort dinner ready in 30 minutes.

Air Fryer Zucchini and Squash
Crisp-edged, tender-in-the-middle zucchini and yellow squash made in 15 minutes with pantry spices. A vibrant, veggie-forward side everyone devours.

Chicken Meatball Parmesan
Tender chicken meatballs simmered in rich marinara and blanketed with melty mozzarella, bringing all the flavors of chicken parm in cozy, bite-sized form.
Did You Make This?
Leave a comment & rating below or tag @yummique on social media!
Rate This Recipe
Share This Recipe
Enjoyed this recipe? Share it with friends and family, and don't forget to leave a review!
Comments (1)
This recipe looks amazing! Can't wait to try it.
Comments are stored locally in your browser. Server comments are displayed alongside your local comments.

Hi, I'm Amira!
What's Popular

30-Minute Meals!
Join to receive our email series which contains a round-up of some of our quick and easy family favorite recipes.