
Peanut Butter and Jelly Cheesecake Bars

A nostalgic twist on two classics, creamy peanut butter cheesecake with a grape jelly glide on a crunchy graham and peanut crust; perfect for parties and family gatherings.
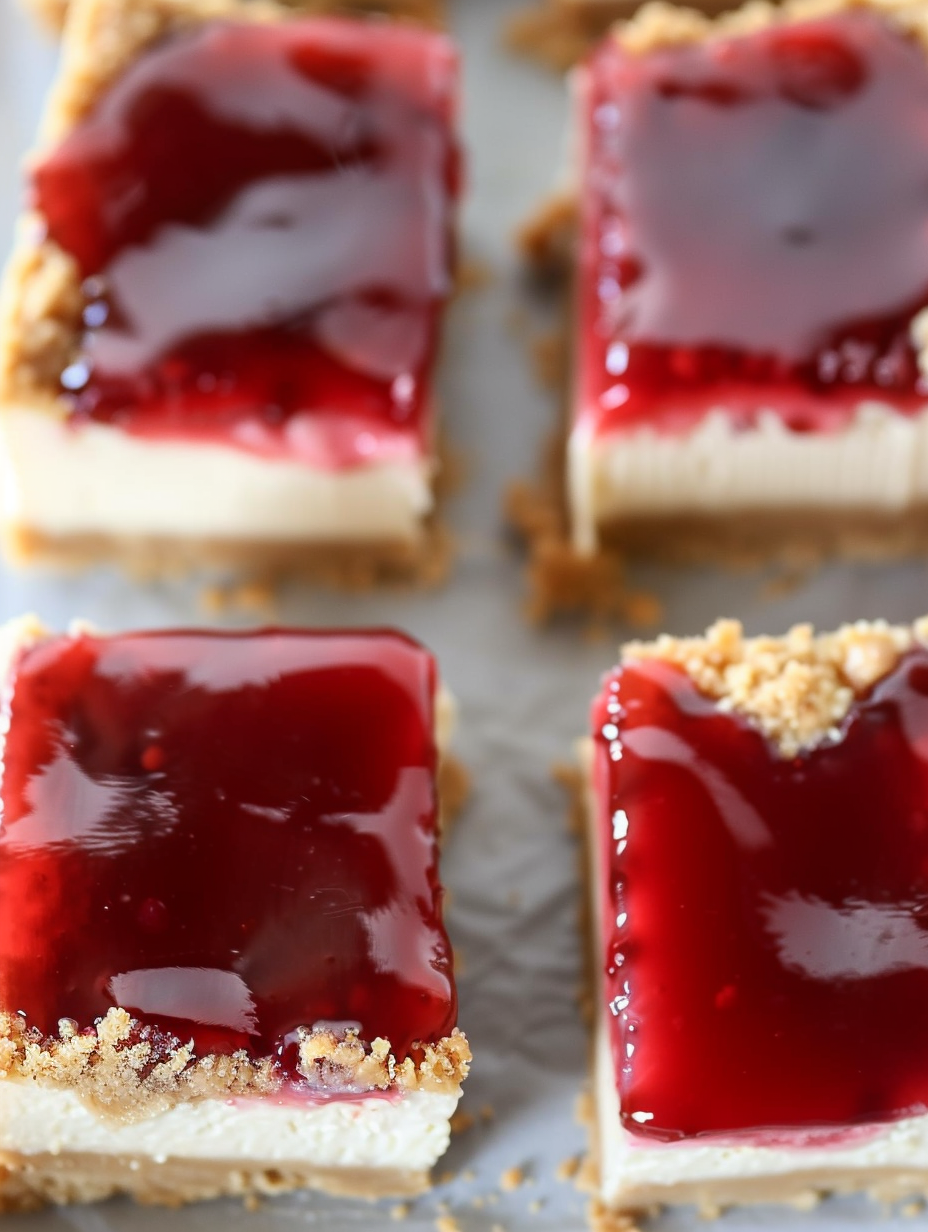
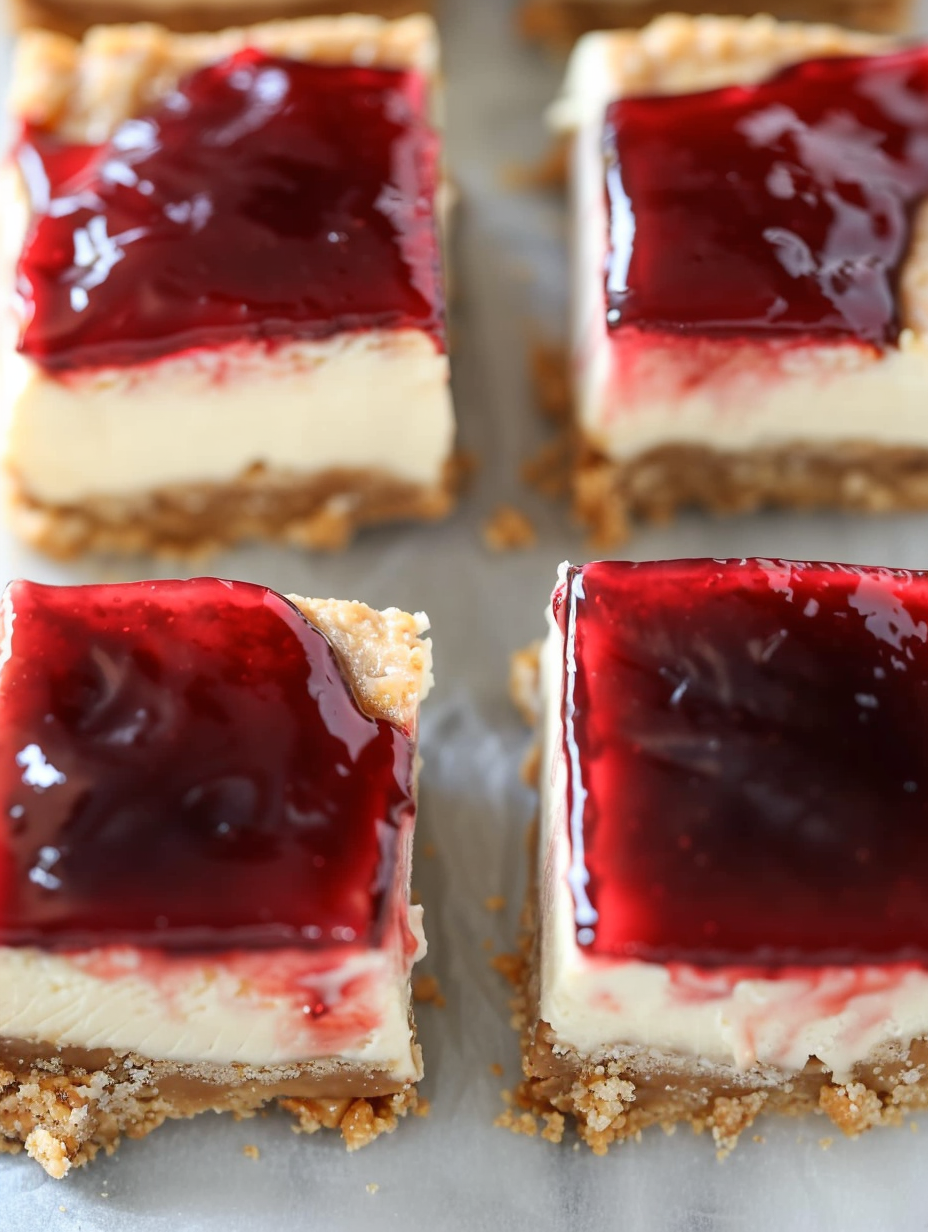
This dessert began as a late afternoon experiment when I wanted to combine two of my favorite childhood comforts into something grown up, elegant, and shareable. These Peanut Butter and Jelly Cheesecake Bars capture that sticky, salty, and sweet balance in a single tray. I first made them for a summer potluck and watched adults and kids reach for second helpings without hesitation. The texture is what hooks people: a buttery, slightly crunchy crust that gives way to a smooth, dense peanut butter filling, finished with a glossy grape jelly layer that adds brightness and nostalgia.
I discovered the combination one rainy afternoon while staring at a half jar of peanut butter and a lonely box of graham crackers. The first batch had a few learning moments, namely how to keep the filling silky rather than cracked and how thin the jelly layer should be to set nicely without sliding off. Now I make a pan whenever the family gathers, for birthday picnics, or when I need an easy dessert to bring to brunch. It travels well, slices cleanly if you chill it long enough, and it gives you that familiar peanut butter and jelly flavor in a slightly more grown up, cheesecake style.
Why You'll Love This Recipe
- This makes about 20 bars, ideal for a crowd or a week of indulgent snacks, and it uses pantry staples like graham crackers, peanut butter, and jelly for convenience.
- The crust combines graham cracker crumbs and crushed roasted peanuts for contrast in texture and a deeper nutty flavor, creating a sturdy base that holds up to the creamy filling.
- The filling is rich from two pounds of cream cheese and a full cup of peanut butter, whipped until light and smooth, but it remains easy to prepare with a stand mixer or hand mixer.
- The jelly layer is gently warmed so it spreads thinly and evenly, so every bite has that classic jam note without overpowering the cheesecake element.
- Make ahead friendly, these bars refrigerate well and can be prepared a day in advance, saving time on busy entertaining days.
- Simple swaps for different jellies or nut butters let you customize the flavor while keeping the method identical, making this recipe flexible for dietary needs and seasonal fruit availability.
When I served this at my niece's graduation party, people kept coming back to the dessert table. Grandparents loved the nostalgic grape jelly, while teens appreciated the peanut butter punch. It is one of those desserts that invites conversation and requests for the recipe.
Ingredients
- Unsalted butter: 6 tablespoons melted, which binds the crust and adds richness. I prefer real unsalted butter such as Land O Lakes for reliable flavor and browning control.
- Graham cracker crumbs: 1 and three quarters cups. Use finely crushed Nabisco style graham crackers to achieve an even, compact crust that presses well into the pan.
- Roasted peanuts: One quarter cup finely crushed. Pulse roasted, salted peanuts in a food processor until coarse to add crunch and savory balance to the sweet crust.
- Brown sugar: One third cup packed. Adds molasses notes that play nicely with the graham crackers and deepen the crust flavor compared to white sugar alone.
- Kosher salt: One teaspoon divided. Salt enhances the sweetness and balances the fat from the cream cheese and peanut butter; use Diamond Crystal or kosher style salt and adjust if using table salt.
- Cream cheese: Two pounds, softened. Four 8 ounce blocks at room temperature whip up smooth and help the filling hold structure without cracking when baked.
- Creamy peanut butter: One cup. Choose a classic brand like Jif or Skippy for smooth texture; natural styles can work but may change the consistency and oil separation.
- Sugar: One cup granulated. Sweetens and helps create a light, fluffy filling when beaten into the cheese and peanut butter.
- Large eggs: Four eggs added one at a time to ensure an even, stable emulsion in the filling.
- Vanilla extract: One teaspoon to round and enhance the overall flavor.
- Concord grape jelly: One cup. I recommend Smucker's Concord grape for that iconic grape flavor, heated briefly to make a loose glaze that sets thinly on top.
Instructions
Prepare and bake the crust Preheat the oven to 350 degrees Fahrenheit. Lightly spray a 9 by 13 inch baking pan with cooking spray. In a mixing bowl combine the graham cracker crumbs, crushed roasted peanuts, brown sugar, and one half teaspoon kosher salt. Stir in the melted butter until the mix resembles wet sand. Press the mixture firmly into the bottom and about three quarters of the way up the sides of the prepared pan so the edges are a little higher than the center. Bake for 12 to 15 minutes, until set and just beginning to brown. Remove from the oven and cool completely on a wire rack to prevent the base from steaming and getting soggy. Make the filling Reduce the oven temperature to 325 degrees Fahrenheit. In the bowl of a stand mixer fitted with the paddle, beat the softened cream cheese and peanut butter together for about five minutes until very smooth. It's important the cream cheese is entirely at room temperature to avoid lumps. Gradually add the sugar and the remaining one half teaspoon salt and beat until the mixture is light and fluffy, scraping down the sides of the bowl as needed. Add the eggs one at a time, beating just until incorporated after each addition to avoid over aerating. Stir in the vanilla extract. The texture should be dense but spreadable, not runny. Assemble and bake Pour the filling into the cooled crust and use a rubber spatula to level the surface. Bake for 40 to 45 minutes. You want the edges to be set and the center to remain slightly wobbly when you gently shake the pan. This ensures a creamy interior after chilling. Avoid overbaking which can lead to cracks and a dry texture. Remove from the oven and cool completely to room temperature on a wire rack before adding the jelly layer. For faster chilling, place the pan in the refrigerator once it is no longer hot to the touch. Glaze and chill In a small saucepan over medium heat gently whisk the grape jelly until it melts into a smooth, pourable glaze. Let it cool for a few minutes so it does not thin the filling by being too hot. Pour evenly over the cooled cheesecake surface and spread lightly with an offset spatula for a thin, even layer. Refrigerate for about two hours until the jelly is set. Use a sharp knife warmed in hot water and wiped dry between cuts to achieve clean bar edges.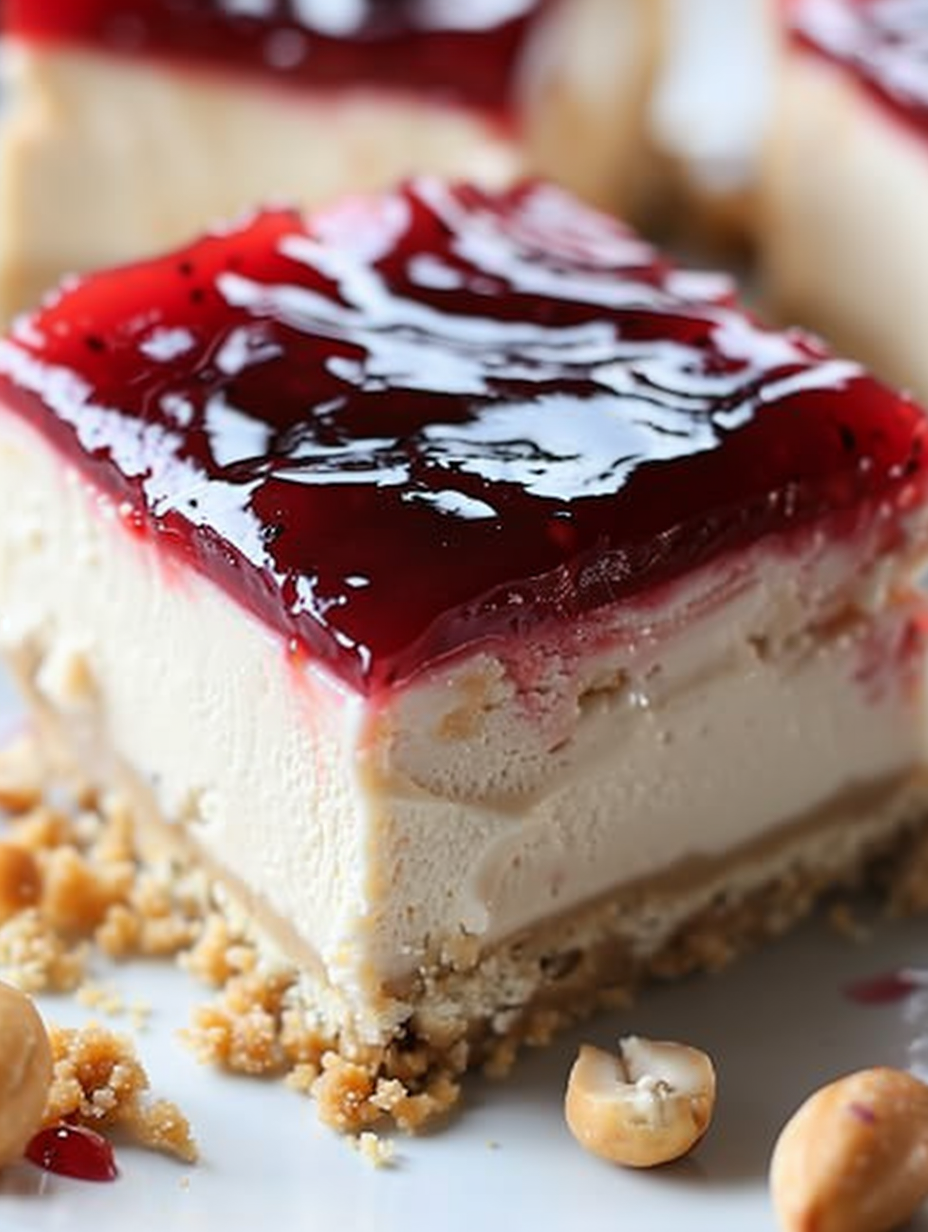
You Must Know
- These bars are best refrigerated and will keep fresh for up to three days in an airtight container. They also freeze well for up to three months when wrapped tightly.
- The jelly layer should be warm but not hot when poured so it adheres without melting the filling; let it cool for about five minutes off the heat.
- Room temperature ingredients produce the most even, lump free filling; cold cream cheese will create clumps in the batter.
- Because the crust contains graham crackers, this is not gluten free unless you substitute certified gluten free graham crumbs and confirm peanuts are processed in a gluten free facility.
My favorite part of this method is how forgiving it is once you follow a few key steps. Let the crust cool before adding the filling, do not overmix once eggs are added, and chill fully before slicing. The result is a neat, sliceable tray of bars that look like a professional bakery item and taste even better because of the sentimental peanut butter and jelly combination.
Storage Tips
Store cooled bars in a single layer in an airtight container in the refrigerator for up to three days. To freeze, cut into bars, wrap each piece tightly in plastic wrap, and place in a heavy duty freezer bag; they will keep up to three months. Thaw overnight in the refrigerator and bring to just slightly above refrigerator temperature before serving to restore creaminess. Avoid leaving the bars at room temperature for more than two hours because of the dairy and egg content.
Ingredient Substitutions
If you want to swap ingredients, creamy almond butter or cashew butter can replace peanut butter for a different nutty profile, though the flavor will be milder. Use any fruit jam in place of Concord grape jelly; raspberry and strawberry are lovely choices. For a gluten free version, choose certified gluten free graham cracker crumbs and ensure the crushed peanuts are uncontaminated. Reduce sugar slightly if using a very sweet jam to avoid an overly sweet bar.
Serving Suggestions
Serve chilled squares on a decorative platter with a light dusting of powdered sugar for a party. Pair with bitter black coffee or a citrusy tea to cut the richness. For a brunch buffet, place alongside fresh berries and plain yogurt to provide contrast. Garnish individual bars with a small dollop of whipped cream and a few crushed peanuts for texture and visual appeal.
Cultural Background
Peanut butter and jelly is an iconic American flavor pairing with roots in early 20th century peanut butter commercialization and the long tradition of fruit preserves. Turning these flavors into a cheesecake bar is a modern American adaptation that blends nostalgic sandwich flavors with classic American dessert technique. The graham cracker crust is an American invention, historically paired with no bake fillings and desserts, and it complements the sweet and savory contrast of this dish.
Seasonal Adaptations
In summer, swap Concord grape with fresh berry jam or a warmed compote for a bright, seasonal layer. In fall consider swapping some of the graham crumbs for crushed gingersnaps and adding a pinch of cinnamon to the filling for warm spice notes. Holiday parties welcome a cranberry orange jelly layer for a festive twist that still follows the same assembly method.
Meal Prep Tips
Make the crust and filling the day before, cover, and refrigerate. Warm and spread the jelly layer on the day of serving to preserve its sheen. Cut with a warm knife for professional slices and place parchment between layers if storing multiple trays in the fridge. Pre portioning into individual containers makes them perfect for grab and go snacks or packed dessert portions.
These bars are a joyful way to honor a childhood favorite while elevating it for grown up gatherings. Try them once and I am confident they will become a requested staple for your own celebrations and weekday treats.
Pro Tips
Bring cream cheese to room temperature before mixing to avoid lumps and ensure a silky filling.
Warm the jelly just until pourable then cool slightly to prevent it from sliding off the filling.
Press the crust firmly into the pan to avoid a crumbly base when slicing the bars.
Use a sharp knife warmed in hot water and wiped dry between cuts for clean bar edges.
Chill the bars at least two hours before slicing so the filling firms and slices hold their shape.
This nourishing peanut butter and jelly cheesecake bars recipe is sure to be a staple in your kitchen. Enjoy every moist, high protein slice — it is perfect for breakfast or as a wholesome snack any time.
Tags
Peanut Butter and Jelly Cheesecake Bars
This Peanut Butter and Jelly Cheesecake Bars recipe makes perfectly juicy, tender, and flavorful steak every time! Serve with potatoes and a side salad for an unforgettable dinner in under 30 minutes.
Ingredients
Crust
Filling
Topping
Instructions
Prepare oven and pan
Preheat oven to 350 degrees Fahrenheit and spray a 9 by 13 inch pan with cooking spray; set aside.
Make crust
Combine graham crumbs, crushed roasted peanuts, brown sugar, and 1/2 teaspoon kosher salt. Mix in melted butter until the texture resembles wet sand. Press into bottom and about three quarters up the sides of the pan and bake 12 to 15 minutes until set and lightly browned. Cool completely.
Make filling
Lower oven to 325 degrees Fahrenheit. Beat cream cheese and peanut butter about five minutes until very smooth. Add sugar and remaining 1/2 teaspoon salt and beat until light. Add eggs one at a time, then vanilla, scraping bowl as needed.
Bake filling
Pour filling into cooled crust and level the top. Bake 40 to 45 minutes until edges are set and center still slightly wobbly. Cool completely to room temperature then chill if desired before glazing.
Glaze and chill
Heat jelly in a small saucepan over medium heat until melted and smooth, then cool slightly. Pour over cooled filling, spread thinly, and refrigerate about two hours until set. Cut into 20 bars, wiping the knife between cuts for clean edges.
Last Step: Please leave a rating and comment letting us know how you liked this recipe! This helps our business to thrive and continue providing free, high-quality recipes for you.
Nutrition
Did You Make This?
Leave a comment & rating below or tag
@yummique on social media!
Categories:
You might also like...

Cheesy Zucchini Rollatini Bake
Tender grilled zucchini wraps basil ricotta, bathed in marinara and mozzarella, baking into a bubbly, lighter Italian comfort dinner ready in 30 minutes.

Air Fryer Zucchini and Squash
Crisp-edged, tender-in-the-middle zucchini and yellow squash made in 15 minutes with pantry spices. A vibrant, veggie-forward side everyone devours.

Chicken Meatball Parmesan
Tender chicken meatballs simmered in rich marinara and blanketed with melty mozzarella, bringing all the flavors of chicken parm in cozy, bite-sized form.
Did You Make This?
Leave a comment & rating below or tag @yummique on social media!
Rate This Recipe
Share This Recipe
Enjoyed this recipe? Share it with friends and family, and don't forget to leave a review!
Comments (1)
This recipe looks amazing! Can't wait to try it.
Comments are stored locally in your browser. Server comments are displayed alongside your local comments.

Hi, I'm Amira!
What's Popular

30-Minute Meals!
Join to receive our email series which contains a round-up of some of our quick and easy family favorite recipes.